 | the Canvas object |
A Canvas is an object designed to contain and position shapes and controls. Every Silverlight XAML file has at least one Canvas. This document introduces the Canvas object and describes how to add, position, and size its child objects. This document contains the following sections.
add an object to your Canvas
A Canvas contains and positions other objects. To add an object to a Canvas,
insert it between the <Canvas> tags. The following example adds an Ellipse object to a Canvas.
Because the Canvas is the root element, it
contains several namespace declarations.
[hide XAML]
<Canvas
   xmlns="http://schemas.microsoft.com/client/2007"
   xmlns:x="http://schemas.microsoft.com/winfx/2006/xaml">

  <Ellipse
     Height="200" Width="200"
     Stroke="Black" StrokeThickness="10" Fill="SlateBlue" />
</Canvas>
[hide] [restart]
A Canvas can contain any number of objects, even other Canvas objects.
position an object
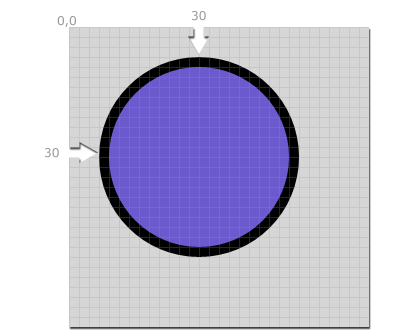
To position an object in a Canvas, you set the Canvas.Left and Canvas.Top attached properties on that object. The Canvas.Left attached property specifies the distance between an object and the left edge of its parent Canvas, and the Canvas.Top attached property specifies the distance between the child object and the top edge of its parent Canvas. The following example takes the Ellipse from the previous example and moves it 30 pixels from the left and 30 pixels from the top of the Canvas.
[hide XAML]
<Canvas
    xmlns="http://schemas.microsoft.com/client/2007"
    xmlns:x="http://schemas.microsoft.com/winfx/2006/xaml">
  <Ellipse
      Canvas.Left="30" Canvas.Top="30"
      Height="200" Width="200"
      Stroke="Black" StrokeThickness="10" Fill="SlateBlue" />
</Canvas>
[hide] [restart]
The following illustration highlights the coordinate system of the Canvas and the position of the Ellipse from the previous example.
z-order
By default, the z-order of objects within a Canvas is determined by the sequence in which they are declared. Objects declared later appear in front of objects declared first. The following example creates three Ellipse objects. Observe that the Ellipse declared last (the Lime-colored one) is in the foreground, in front of the other Ellipse objects.
[hide XAML]
<Canvas
    xmlns="http://schemas.microsoft.com/client/2007"
    xmlns:x="http://schemas.microsoft.com/winfx/2006/xaml">

  <Ellipse
      Canvas.Left="5" Canvas.Top="5"
      Height="200" Width="200"
      Stroke="Black" StrokeThickness="10" Fill="Silver" />

  <Ellipse
      Canvas.Left="50" Canvas.Top="50"
      Height="200" Width="200"
      Stroke="Black" StrokeThickness="10" Fill="DeepSkyBlue" />

  <Ellipse
      Canvas.Left="95" Canvas.Top="95"
      Height="200" Width="200"
      Stroke="Black" StrokeThickness="10" Fill="Lime" />

</Canvas>
[hide] [restart]
You can change this behavior by setting the Canvas.ZIndex attached property on objects within the Canvas. Higher values are closer to the foreground; lower values are farther from the foreground. The following example is similar to the preceding one, except that the z-order of the Ellipse objects is reversed: the Ellipse declared first (the silver-colored one) is now in front.
[hide XAML]
<Canvas
    xmlns="http://schemas.microsoft.com/client/2007"
    xmlns:x="http://schemas.microsoft.com/winfx/2006/xaml">

  <Ellipse
      Canvas.ZIndex="3"
      Canvas.Left="5" Canvas.Top="5"
      Height="200" Width="200"
      Stroke="Black" StrokeThickness="10" Fill="Silver" />

  <Ellipse
      Canvas.ZIndex="2"
      Canvas.Left="50" Canvas.Top="50"
      Height="200" Width="200"
      Stroke="Black" StrokeThickness="10" Fill="DeepSkyBlue" />

  <Ellipse
      Canvas.ZIndex="1"
      Canvas.Left="95" Canvas.Top="95"
      Height="200" Width="200"
      Stroke="Black" StrokeThickness="10" Fill="Lime" />

</Canvas>
[hide] [restart]
controlling width and height
Canvas, shapes, and many other elements have Width and Height properties that enable you to specify their size. The following example creates an Ellipse that is 200 pixels wide and 200 pixels tall. Note that percentage sizes are not supported.
[hide XAML]
<Canvas
    xmlns="http://schemas.microsoft.com/client/2007"
    xmlns:x="http://schemas.microsoft.com/winfx/2006/xaml">
  <Ellipse
      Canvas.Left="30" Canvas.Top="30"
      Height="200" Width="200"
      Stroke="Black" StrokeThickness="10" Fill="SlateBlue" />

</Canvas>
[hide] [restart]
The next example shows also sets the Width and Height of the parent Canvas to 200 and gives it a lime green background.
[hide XAML]
<Canvas
   xmlns="http://schemas.microsoft.com/client/2007"
   xmlns:x="http://schemas.microsoft.com/winfx/2006/xaml"
   Width="200" Height="200"
   Background="LimeGreen">

  <Ellipse
    Canvas.Left="30" Canvas.Top="30"
    Height="200" Width="200"
    Stroke="Black" StrokeThickness="10" Fill="SlateBlue" />
</Canvas>
[hide] [restart]
When you run the example, the lime green square is the Canvas and the gray background is the portion of the hosting control that's not obscured by the Canvas. Notice that the Ellipse is not clipped, even though it extends past the bounds of the Canvas.
Both Width and Height default to zero if you don't set them.
nested Canvas objects
Canvas can contain other Canvas objects. The following example creates a Canvas that itself contains two other Canvas objects.
[hide XAML]
<Canvas
    xmlns="http://schemas.microsoft.com/client/2007"
    xmlns:x="http://schemas.microsoft.com/winfx/2006/xaml">
  <Canvas Height="50" Width="50" Canvas.Left="30" Canvas.Top="30"
      Background="blue"/>

  <Canvas Height="50" Width="50" Canvas.Left="130" Canvas.Top="30"
      Background="red"/>
</Canvas>
[hide] [restart]
what's next
The next topic, drawing and painting, describes how to create complex shapes and how to paint with solid colors, gradients, and images.
Copyright © 2007 Microsoft Corporation. All rights reserved. Legal Notices.